
So you have a dull knife and you want to learn how to sharpen a pocket knife? You’re in luck. The process below will give you that mirror polished bevel that you are looking for.
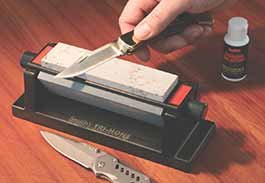
Whetstone
I like to soak the stone in water before use, but you do not have to soak some
, just follow directions. I personally just do it out of practice. I’ll also add a bit of water on the surface, I find the particles just tend to float and your stone doesn’t get as clogged. And oh yeah, start with the course side of the stone first.
To start off with I find my bevel on my knife edge, I can usually do this by feel. However, If you are just starting out, a good tip is to take a sharpie and put a mark down the bevel of the knife. This will allow you to see if you are hitting the entire bevel as you run the blade across the stone.

I start the process by running a few quick passes over the course side of the stone, you can usually start to develop a bur after about 10 passes. At this point you can inspect the bevel to confirm you’re hitting the full length of the bevel. If you are still seeing the sharpie marks, or the scratch pattern isn’t fully even then you are not hitting the full length of the bevel and you will need to focus more on those areas to keep everything as consistent as possible. Once you feel you have hit the entire bevel repeat the process on the other side.
When you have the scratch pattern uniform on both sides and you feel the knife is as sharp as possible, you are ready to move on to the next grit. You can test the sharpness of the blade by resting the blade on your fingernail, if the blade catches then you have a good sharp edge. You can also run your fingernail up the blade (carefully & softly) to feel any nicks in the blade.
Let’s move on to the medium grit side of the stone. The process is pretty much the same. I’ll once again find my bevel, either by feel or I’ll use the sharpie technique. I’ll make a bunch of passes until I start to develop the bur on the blade and then I’ll repeat the process on the opposite side of the blade. I’ll get the knife as sharp as possible and then move on to the next grit, or if I’m in a hurry I can end the process right here. The knife is sharp enough to cut what you need, but if you want it scary sharp. Then let’s proceed.
2 Sided Waterstone (1000 Grit | 6000 Grit)
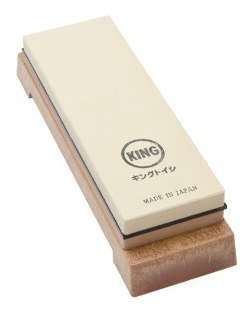
Unlike the whetstone, the waterstone MUST be used soaked in water. You cannot use this stone dry. And you must be careful using a this type of stone, if your angle is to steep you can cut into the stone and damage it, and your surface will not be even any more.
One tip with working with water stones, you can get a lot of good feedback from the stone. As in you’ll know if you’re hitting the bevel just by feel and the sound.
Start with 1000 grit side
So again, same process, find the bevel and start making some passes. At this point you most like will not get a bur very quickly, so whatever you do to one side of the bevel, keep that consistent and try to do the same to the other side of the bevel. So just keep making those passes and get it sharp as you can before moving on to the next grit.
On to the 6000 grit side
At this point the knife is getting very sharp. The feedback on this side is much more subtle, you won’t be able to hear it like you could on the 1000 grit side, but you will be able to feel it. You’ll know you’re doing it right when the knife just glides along the surface of the stone. It’ll feel really really smooth and you will not feel any catches. So just make light passes on each side of the bevel, remember to keep the passes consistent on each side.
So at this point you will have the beginnings of a very nicely polished bevel, it will not be mirror polished. 6000 grit isn’t really high enough to get that mirror finish. If you are looking for the mirror polish you will need a much more fine grit stone, like the
.
Ceramic Stone
The grit is so fine on this stone it’s a lot easier to make fewer mistakes. Same process though, consistent passes on each side and the bevel will start getting that mirror polish you are looking for.

Leather Strop
The final stage of the process is the leather strop. If you want your knife to go from really sharp to just crazy sharp this stage will do it. I’ve made mine out of an old leather belt I glued to a 2×4, no need to buy one of these if you have the materials around the house. You can see the process to make your own here.
Just apply some honing compound on the leather strop. So, at this point the more passes the better, start doing really light passes over the leather strop, maybe like 40 passes on each side, point the blade edge away and pull back to you. Keep making passes until you feel you have the knife as sharp as possible.
That’s It, That’s How to Sharpen a Pocket Knife
So, you wanted to learn how to sharpen a pocket knife didn’t ya. Didn’t know it was this involved? It really isn’t, this process is very much over kill for the average guy. You could stop after the medium grit and still have a very sharp pocket knife. But for the enthusiast, this process will get you from the respectable sharp knife, to that scary sharp cut your own dang finger off by accident sharp. So be careful and have fun.